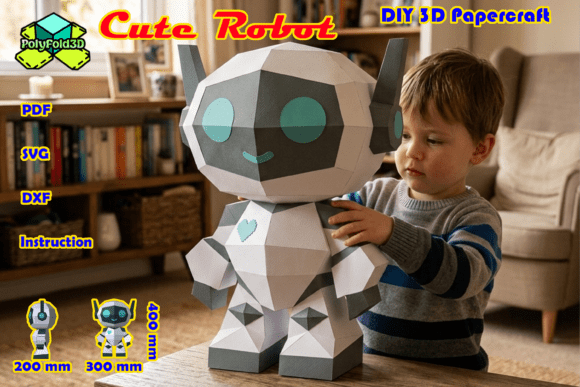
Cute Robot DIY 3D Papercraft
In an era where digital interfaces dominate our daily interactions, there is a distinct charm in bringing virtual concepts into the physical world. The Cute Robot DIY 3D Papercraft offers more than just a simple craft project; it serves as a bridge between creative expression and tangible design. Whether you are looking to add a unique touch to a nursery, revitalize a tech-themed workspace, or engage children in a meaningful weekend activity, this project provides a structured yet flexible framework for creation. By utilizing the Cute Robot 3D Papercraft Template, creators can assemble their own intergalactic companion, transforming flat sheets of paper into a three-dimensional object that commands attention and sparks conversation.
This approach to papercrafting is particularly appealing because it removes the barrier of entry associated with complex modeling software or expensive materials. Instead, it relies on precision cutting and logical assembly, making it accessible to hobbyists, educators, and professionals alike. The result is not merely a toy but a decorative piece that reflects patience, attention to detail, and a love for geometric aesthetics. For those who appreciate the intersection of technology and traditional craftsmanship, building this robot becomes a meditative process that yields a satisfying, high-impact visual reward.
Understanding the Digital Workflow and File Formats
A significant advantage of modern papercraft lies in its digital delivery system. When you acquire the Cute Robot DIY 3D Papercraft template, you are receiving a comprehensive digital package designed to accommodate various skill levels and tool preferences. This flexibility ensures that whether you are a seasoned designer using vector software or a beginner preferring manual methods, the path to completion remains clear and efficient.
The download includes several file formats tailored to specific workflows:
- SVG Files: These are optimized for use within Cricut Design Space and Silhouette Designer Edition. If you own a electronic cutting machine, these files allow for precise, automated cutting, significantly reducing the time spent on manual trimming.
- DXF Files: Compatible with Silhouette Studio Basic Edition, these files provide an alternative for users who may not have access to the higher-tier Designer Edition software.
- Printable PDF: For those who enjoy the tactile experience of hand-cutting, a high-resolution PDF template is included. This option allows for complete control over the cutting process and is ideal for creating custom textures or using specialized paper stocks.
By providing these varied formats, the template supports a broader range of users. Educators might choose the PDF for classroom activities where students learn fine motor skills through hand-cutting, while professional decorators might opt for SVGs to produce multiple identical units quickly for event styling. This versatility underscores the practical value of the resource, ensuring it fits seamlessly into diverse creative processes.
Navigating Technical Considerations for Precision
While the concept of assembling a 3D model from paper sounds straightforward, achieving a professional finish requires adherence to specific technical guidelines. One of the most common pitfalls in digital papercraft involves scaling issues, particularly when importing vector files into cutting software. Recent updates to platforms like Cricut Design Space have introduced changes that can inadvertently alter the size of imported SVG files, leading to pieces that do not fit together correctly.
To ensure your Cute Robot DIY 3D Papercraft assembles without frustration, it is crucial to follow a specific scaling protocol. Immediately after importing the SVG file, group all elements together. Within the file, look for the designated Safety Boundary Box. Using the top toolbar, manually set the width (W) to exactly 190 mm, ensuring that the aspect ratio lock is engaged. Once the boundary measures precisely 190 mm by 277 mm, your file is calibrated correctly. This step is non-negotiable for maintaining the structural integrity of the final model. Without proper scaling, tabs and slots will misalign, resulting in gaps or forced connections that compromise the aesthetic appeal of the robot.
This attention to detail highlights a broader principle in DIY projects: preparation prevents errors. By taking the time to verify dimensions before cutting any material, you save both time and resources. It also reinforces the importance of reading instructions thoroughly, even when they involve technical adjustments. For users who prioritize efficiency, mastering this workflow early on pays dividends in future projects, as many high-quality papercraft templates rely on similar scaling conventions.
Material Selection and Assembly Strategy
The success of your Cute Robot DIY 3D Papercraft depends heavily on the materials chosen. While standard printer paper works for practice runs, it lacks the rigidity needed to hold the 3D structure upright. For the final build, consider using cardstock with a weight between 180gsm and 250gsm. Heavier papers provide better stability, allowing the robot to stand securely on a shelf or desk without requiring excessive internal support. Additionally, experimenting with different finishes—such as matte, glossy, or textured cardstock—can enhance the visual impact, giving the robot a futuristic or retro-futuristic appearance depending on your preference.
Assembly begins with careful cutting. Whether using a blade or a cutting machine, ensure that cuts are clean and edges are smooth. Rough edges can interfere with the adhesion process, leading to weak joints. Once all pieces are cut, refer to the included step-by-step PDF guide. This manual breaks down the construction into manageable stages, typically starting with the base and working upward. Folding along pre-scored lines is essential; using a bone folder or the blunt edge of a knife can create sharp, crisp creases that improve the overall geometry of the model.
Adhesive selection is another critical factor. Liquid glue tends to warp paper if applied too generously, so gel glue dots or a thin line of white glue applied sparingly is often preferable. Allow sufficient drying time between steps to ensure that each section sets properly before adding weight or stress to the structure. This methodical approach mirrors best practices in engineering and design, where incremental validation leads to a robust final product.
Practical Applications and Creative Outcomes
Once assembled, the Cute Robot DIY 3D Papercraft transforms into a versatile decorative object with a finished height of 400 mm (15.7 inches), a width of 300 mm (11.8 inches), and a depth of 200 mm (7.9 inches). These dimensions make it substantial enough to be a focal point but compact enough to fit on standard furniture. In a nursery, it adds a whimsical element that grows with the child, potentially serving as a storytelling prop or a gentle nightlight housing if modified safely. In a tech office, it acts as a conversation starter, reflecting a culture that values innovation and hands-on creativity.
For educators, this project supports STEM learning by introducing concepts of geometry, spatial reasoning, and structural integrity. Students can explore how two-dimensional shapes transform into three-dimensional forms, reinforcing mathematical principles in a tangible way. Similarly, for marketers or content creators, the robot can serve as a branded mascot or a prop for social media content, offering a unique visual asset that stands out in crowded feeds.
However, it is important to acknowledge limitations. The model is made of paper and is not designed for rough handling or outdoor use. It should be kept away from moisture and direct sunlight to prevent fading or warping. Users should also consider the complexity level; while the instructions are clear, the project requires patience and steady hands. It may not be suitable for very young children without adult supervision, particularly during the cutting and gluing phases.
Conclusion
The Cute Robot DIY 3D Papercraft represents a thoughtful blend of digital convenience and analog satisfaction. By providing high-quality templates, clear instructions, and adaptable file formats, it empowers users to create a durable and visually striking object. Whether used for decoration, education, or personal enjoyment, the process of building this intergalactic companion offers a rewarding escape from screens and routines. With careful attention to scaling and material selection, anyone can achieve a professional-looking result that celebrates the joy of making something with their own hands.