Transform Your Space with the 3D Wall Shelf Laser Cut Digital Design
Home decor is no longer just about filling empty corners; it is about curating an environment that reflects your personality, enhances functionality, and sparks joy. In recent years, the trend of custom wall art has surged, moving away from mass-produced items toward unique, personalized pieces. At the heart of this movement is the 3D Wall Shelf Laser Cut design—a digital solution that bridges the gap between modern technology and artisanal craftsmanship. This isn't just a shelf; it is a statement piece that combines utility with aesthetic depth.
If you are looking to add a touch of sophistication to your living room, office, or bedroom, understanding how to leverage digital cut files can open up a world of creative possibilities. The following guide explores everything you need to know about bringing this specific design to life, from file formats to material selection, ensuring your project is both successful and visually stunning.
Understanding the Digital Product Advantage
Before diving into the construction process, it is crucial to understand what you are purchasing. When you acquire the 3D Wall Shelf Laser Cut design, you are not receiving a physical object shipped to your doorstep. Instead, you are investing in a high-quality digital asset that empowers you to create the item yourself. This approach offers unparalleled flexibility and cost-efficiency.
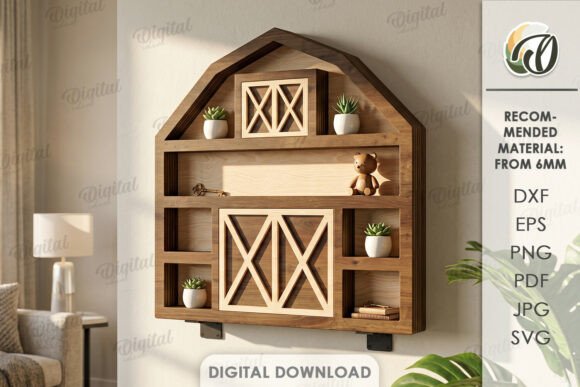
The product comes as a comprehensive zip folder containing the design in multiple industry-standard file formats: SVG, DXF, EPS, PDF, JPEG, and PNG. Why so many formats? Because different cutting machines and software programs require different file types. Whether you own a Cricut, Silhouette, Glowforge, or have access to a professional laser cutting service, these files ensure compatibility. The vector formats (SVG, DXF, EPS) allow for precise scaling without loss of quality, while the raster formats (JPEG, PNG) serve as excellent visual references during the planning phase.
Why Choose a Digital Download?
- Instant Access: Start your project immediately after purchase without waiting for shipping.
- Customization: Resize the design to fit any wall space before you cut.
- Reusability: Create multiple units for a gallery wall or give them as gifts.
- Eco-Friendly: Reduce waste by only cutting what you need and choosing sustainable materials.
Material Selection: The Importance of 6mm Width
One of the most critical aspects of executing the 3D Wall Shelf Laser Cut project successfully is selecting the right material. The design specifications explicitly state that a material width of 6mm is required. This is not a suggestion; it is a structural necessity for the interlocking or layered mechanism inherent in most 3D laser-cut designs.
Using material that is too thin (such as 3mm plywood) may result in fragile joints that cannot support the weight of displayed items. Conversely, material that is too thick (like 10mm MDF) might prevent pieces from fitting together seamlessly if the design relies on tight tolerances. For this project, consider the following material options:
- Birch Plywood: A top choice for its smooth surface, strength, and attractive grain. It cuts cleanly and takes stain beautifully.
- MDF (Medium Density Fiberboard): Ideal for painted finishes. MDF provides a uniform look but is heavier than plywood.
- Ambi Board: A popular alternative to MDF that is lighter and easier to work with, offering a clean white finish.
- PVC Foam Sheet: Great for indoor use where moisture resistance is needed, such as in bathrooms or kitchens.
When sourcing your 6mm board, ensure it is flat and free of warping. Warped material can lead to uneven shelves and misaligned layers, compromising the 3D effect.
Cutting and Assembly: Bringing the Design to Life
With your materials ready, the next step is the cutting process. If you are using a personal laser cutter, load the appropriate file format (DXF or SVG usually works best for lasers) into your software. Ensure your settings are calibrated for 6mm wood or acrylic to achieve clean edges and minimal charring. If you are outsourcing the cutting, send the vector files to your provider and confirm they are aware of the 6mm thickness requirement.
Once the pieces are cut, assembly is typically straightforward. Most 3D Wall Shelf Laser Cut designs utilize a slot-and-tab system. You will simply slide the pieces together like a puzzle. However, attention to detail here is key:
- Test Fit: Always do a dry run without glue to ensure all parts align correctly.
- Sanding: Lightly sand any rough edges to prevent splinters and ensure a professional finish.
- Finishing: Stain, paint, or seal the wood according to your desired aesthetic. Matte finishes often highlight the shadows and depth of the 3D design better than glossy ones.
Styling and Placement Ideas
The beauty of the 3D Wall Shelf Laser Cut lies in its versatility. It serves as both storage and art. Here are some practical ways to integrate this piece into your home or office:
The Entryway Organizer
Install the shelf at eye level near your front door. Use the deeper sections to hold keys, mail, or small decorative objects. The 3D texture adds visual interest to what is often a neglected space, setting a welcoming tone as soon as you walk in.
The Home Office Accent
In a workspace, clutter is the enemy of productivity. A sleek, geometric wall shelf keeps essential items—pens, notebooks, or tech accessories—within reach but out of sight. Its modern aesthetic complements minimalist desk setups, enhancing focus without distracting visuals.
The Living Room Gallery
Create a feature wall by installing multiple 3D Wall Shelf Laser Cut units in varying sizes or configurations. Mix and match orientations to create a dynamic pattern. Fill the shelves with trailing plants, framed photos, or ceramics. The interplay of light and shadow across the 3D surfaces changes throughout the day, adding a living quality to your decor.
Common Considerations Before You Start
While the process is accessible to beginners, there are a few factors to keep in mind to ensure satisfaction:
Wall Type: Ensure your walls can support the weight. Drywall requires anchors, while stud-mounted installations offer the most security. If you are renting, consider heavy-duty adhesive strips designed for wood, though mechanical fixing is always recommended for safety.
Lighting: The 3D effect is heavily dependent on lighting. Position the shelf near a window or install directional spotlights to accentuate the depth and shadows. Poor lighting can flatten the design, making it look like a standard 2D shelf.
Weight Limits: While the design is sturdy, remember that laser-cut joints have limits. Avoid placing excessively heavy books or electronics on the smallest shelves. Stick to lightweight decor, small potted plants, or everyday essentials.
Conclusion: Unlock Your Creativity
The 3D Wall Shelf Laser Cut digital download is more than just a set of instructions; it is an invitation to engage in the rewarding process of DIY creation. By providing versatile file formats and clear material guidelines, this product allows you to tailor the final result to your exact needs and style preferences. Whether you are a seasoned maker or a curious beginner, the possibilities for creation are truly endless.
We appreciate you visiting our store and considering our designs for your home improvement projects. We strive to provide high-quality resources that inspire creativity and simplify the crafting process. If you have any questions regarding the file formats, cutting settings, or assembly tips, please do not hesitate to write us a message. Our team is here to help you succeed.
Happy shopping, and enjoy the satisfaction of building something beautiful with your own hands!